Unlike any other provider, our system makes it easy to designate placement for PEM fasteners, auto-adjusts your hole sizes, tells you immediately if your design is manufacturable, and shows you the ideal production sequence.
Video Transcript:
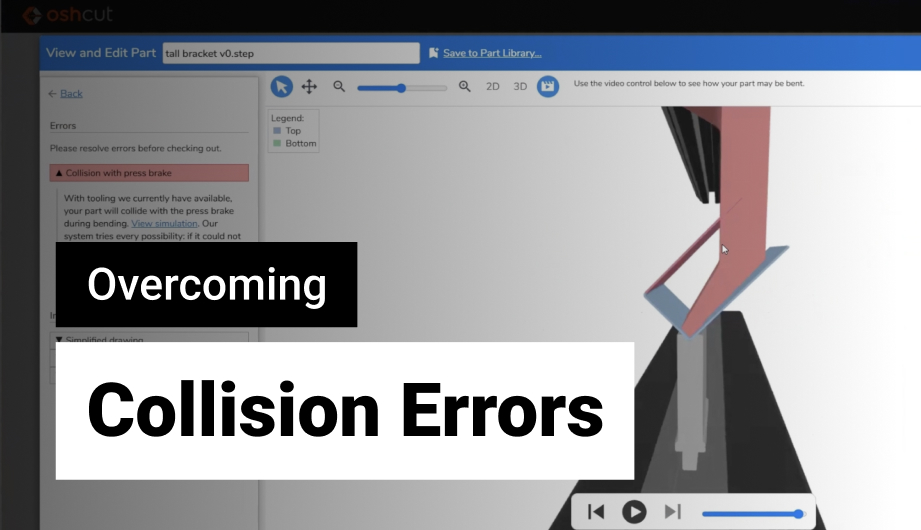
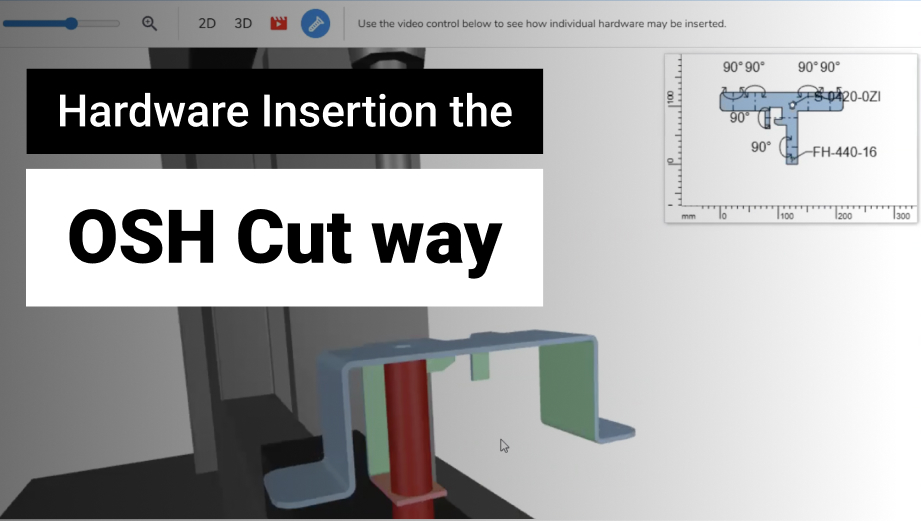
Let's walk through how to order Hardware Insertion through OSH Cut's online portal. We'll start by uploading a 3D model as usual. Our system automatically unfolds it and prepares it. We'll pick a material. Now to select Hardware, click into the part by clicking on the title or thumbnail. Here's the flat pattern created by our system, and here's the 3D model. You'll go to the 2D view and select a hole, and then select Hardware. Then, click Select from Catalog. We have 450 options today and are continuously adding more. So, if you need something you don't see, definitely reach out and we can add it for you. For this example, I'll pick this 1-inch long, 440-threaded stud. Notice that we automatically change the hole size to be correct for that hardware. And then, always look at the 3D view to make sure it's doing what you expect it to; this one looks good. We can insert hardware either before bending or after. In this case, we can look at what the system did by clicking this PEM icon at the top and it actually shows that PEM being inserted on our press, and it does a full collision check. In this case, the stud is going down into the anvil here, so you can't it but it is being inserted there. Our system also does a full bend simulation to make sure we can bend the part without collision after inserting the hardware, and in this case, it works just fine.
Now, suppose I want the stud going the opposite direction. You'll go back to the 2D view, click that item, and change the insertion side to the Top instead of the Bottom, confirm with the model that it looks like you expect, and does it work? Well, let's click the animation. Sure enough, it does. In this case, our system noticed that a straight punch would have collided with the hardware, so it automatically switched to a swan-neck punch so that it could make that part ... and everything works after that.
Now suppose that we want to add another piece of hardware ... I'll pick a quarter-twenty PEM nut. It is checking the part (it's taking a little longer this time) and it did find an error. So, it was unable to find a way to insert these before or after bending that avoided collisions in all cases. If I look at the hardware case, here it is trying to do the insertion after bending because it was unable to find a sequence before bending that didn't cause collisions, and there's no way to do it after bending either because [the press or tools] collide with the part. If we go to the bending animation, we can see similar problems; it's unable to find a sequence that works ... look how it collides as it goes across. This shows one sequence, but there does not exist any sequence that would work with this combination of hardware and bent [metal]. If I go back here and change the insertion side to the Top, it actually just happens to work for this part, so now we can see that full sequence bend without collision, with both of those hardware options. And as always, if the part passes manufacturability check, then of course you get an instant price and an instant lead time and you can check out and have confidence that you'll get that part on the correct timeline.